Nintendo DS ARM ASM Tutorials
Some tutorials including instructions for setting up Programmers Notepad for ARM ASM hilighting.
NOTE: You will need our modified version of grit to compile
Setting up the compiler
- Download the latest version of DevKitPro from http://www.devkitpro.org/ (currently devkitProUpdater-1.4.9.exe)
- Run the installer and select to download and install the full package (this includes tools for compiling GBA/NDS/GP32/PSP/GameCube/Wii binaries)
- To compile all the NDS examples just open devkitPro\examples\nds\allexamples.pnproj and select Tools->Make
- Download the following emulators into devkitPro\emulators*emuname*
- Visualboy Advance (GBA) http://vba.ngemu.com
- No$GBA (GBA / NDS) http://nocash.emubase.de/gba.htm
- DeSmuME (NDS) http://desmume.org/
- iDeaS (NDS) http://www.ideasemu.org
- NeonDS (NDS) http://www.neonds.com
- Dualis (NDS) http://dualis.1emu.net/
- Create a folder called devkitPro\source\gba and devkitPro\source\nds
- Your ready to go!
NOTES:
- I also suggest you take a look at GBATek for technical info on the GBA & NDS
- Also check out the PDF cheat sheet for a quick guide to the ARM instruction set
- For Windows XP I recommend the Command Line Here tool so you can right click in a folder to open the command prompt for compiling.
- lec09_ARMasm is a simple power point presentation introducing some of the basic aspects of the ARM processor
Setting up Programmers Notepad
Here's a quick guide to using Programmers Notepad as an IDE for compiling NDS binaries. The first thing I noticed is that the templates were all messed up in my examples I posted so I have fixed them all and reposted them.
On the left side of the screen you have a Projects window that should have the arm7 and arm9 folders and in them "header" and "source" folders containing the source code.
For some reason the posted examples were stuffed and I had to delete their folders and add new ones. Then inside those folders you right click and add the source files.
Now you should have all your source files in folders on the left of the screen. Double clicking a file should open it up for editing. You can double click the titlebar to make it fill the space available.
First of all the syntax hilighting is not really working for arm so I added some of the opcodes myself. Download the attached file called programmers_notepad_arm_asm_scheme.zip and extract the asm.scheme file to C:\devkitPro\Programmers Notepad\schemes overwriting the old one. Now you will at least see the arm opcodes hilighted. Unfortunately it doesn't recognize '@' commented lines and I could not for the life of me change that.
Now we should have syntax hilighting working okay. Next we will look at the 3 most important features of this IDE.
Under the Tools menu you will see "make", "clean" and "run".
-
"make" - will simply call make on the makefile and build the project.
-
"clean" - will clean the project and compile fresh. This is important if major changes were made and the project needs a complete recompile
-
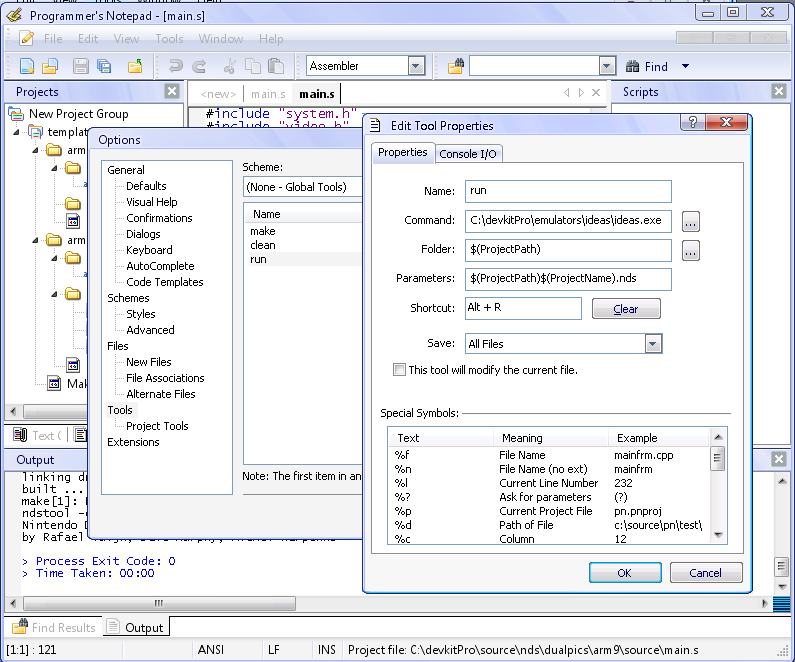
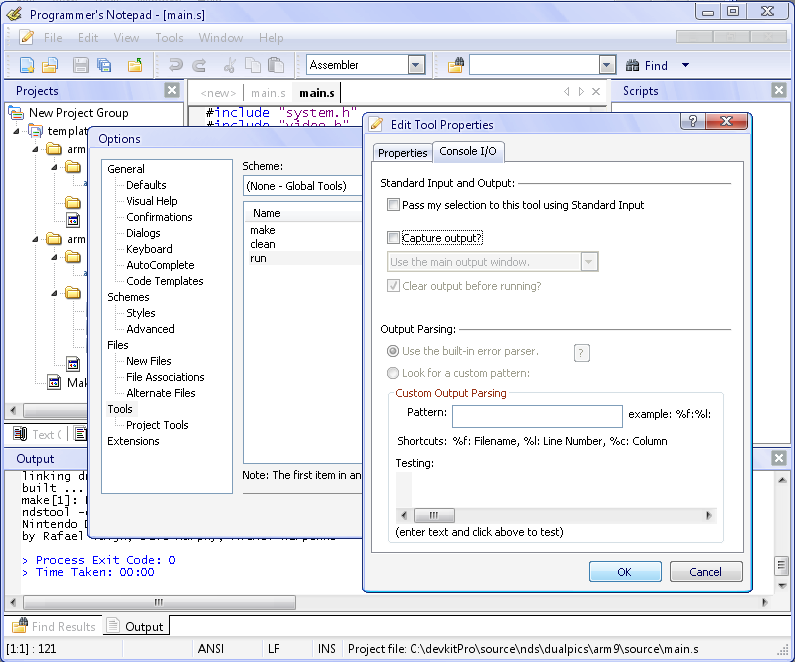
"run" - This should launch the emulator and run your compiled .nds file. By default this is not set up but I have reuploaded the projects and changed this.
You need to open the MyProject.pnproj file in notepad and change the
Now you will need to view the attached images which will guide you through setting up iDeaS to run when you select Tools->run from the menu.


Compiling your first NDS ASM binary
- If you haven't already followed the Setting up the compiler I suggest you do that first
- Take a look at helloworld helloworld.zip
- Create a folder called devkitPro\source\nds\asmtest
The NDS uses both an ARM7 and ARM9 binary that is linked into the one .nds
ARM7 main.s
.arm
.text
.global main
main:
    b main
ARM9 main.s
.arm
.align
.global initSystem
.global main

initSystem:
    bx lr

main:
    mov r0,#0x04000000      @ I/O space offset
    mov r1,#0x3             @ Both screens on
    mov r2,#0x00020000      @ Framebuffer mode
    mov r3,#0x80            @ VRAM bank A enabled, LCD

    str r1,[r0, #0x304]     @ Set POWERCNT
    str r2,[r0]             @     DISPCNT
    str r3,[r0, #0x240]     @     VRAMCNT_A

    mov r0,#0x06800000      @ VRAM offset
    mov r1,#31              @ Writing red pixels
    mov r2,#0xC000          @ 96k of them

lp: strh r1,[r0],#2         @ Write a pixel
    subs r2,r2,#1           @ Move along one
    bne lp                  @ And loop back if not done

nf: b nf @ Sit in an infinite loop to finish- Run "make" from the command line to compile
This is based on Two9A's The Smallest NDS File source. All the demo source available in this repo updated for devkitARM r27
Grit
Our version of grit adds an option (-mp) which allows you to specifiy the palette number for map's. This is handy if your using 16 color tiles and need to share a palette and the palette isn't at entry 0.
Just copy the files over C:\devkitPro\devkitARM\bin
To use palette 15 for example add the following to your grit file:
-mp15Another command line option we added is called called "-fha" which means to output the header file in assembly format.
Source
Thanks
Wintermute for devkitARM, Chishm for libfat, Martin Koth for DSTek & No$GBA, Eris & Noda for EFS / NitroFS. Also thanks go to LiraNuna, Blasty, Strager, Two9A, Cearn, Dovoto, Jasper, Joat, Dekutree, Elhobbs, Ruben, SimonB, DarkCloud and everyone on gbadev.org.
- Flash & Headkaze
