
![]()
Compression, Files Systems Screen Effects and MOD Players for the Gameboy Advance
Version 1.2
History
- 22 February 2004 - Added PuCrunch
- 21 February 2004 - Added aPLib compression library
- 14 February 2004 - Added Music Wave Engine code
- 10 February 2004 - Added MASO Player code
- 9 February 2004 - Added Fras Player code
- 7 February 2004 - Changed colour scheme & added some more MOD Player code
- 6 February 2004 - Version 1.2 - Added a section on MOD Players
- 4 February 2004 - Version 1.01 - Added some ADPCM code by tepples
- 2 February 2004 - Version 1.0 - First release
Introduction
This is by no means a definitive guide to using compression on the GBA but it is a good introductory guide on how to get some routines working for your own projects, in other words this is not a turtorial about compression, but a tutorial on how to get compression working in your own projects. I wrote this during investigations into these areas because there didn't seem to be much out there on this topic. This is my contribution to a community that has given me plenty of help in return over the years. I am by no means a professional and most of the information and large portions of the code provided here have been taken from other sources such as forum.gbadev.org. I have tried to reference most of these sources. I haven't gone into exhaustive technical detail and tried to keep it readable for the beginner. I hope you find this a valuable resource. Many thanks to the people who have contributed and helped with the information provided in this tutorial.
What I don't cover in this tutorial can probably be found at Dovoto's PERN Project, in Jeff Frohwein's Dev'rs GBA Dev FAQs or in tepple's GBADev FAQ. If you still can't find answers to your questions, why not do a search or post on forum.gbadev.org or download mIRC and join #gbadev on EFNet. Also a nice document about the GBA's audio hardware can be found at BeLogic.
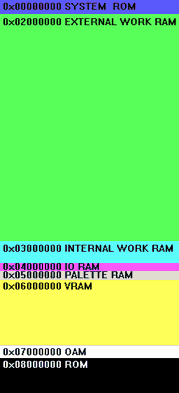
GBA Memory
It's important you get to know the different memory areas of the GBA and how they are used before you get into programming it. A good place to get the technical 'nitty gritty' of the machine is the reference guide Cowbite Virtual Hardware Specs and The Gameboy Advance Technical Info documents.
- GBA Memory Model
GBA Header
The GBA Header is a 192 Byte ROM Header that is required at the beginning of every ROM to run on hardware. JSensebe mentions that an extra 32 bytes of code is added for multiboot ROMs immediately after this header. You can get gbafix by Dark Fader which will add the ROM Header to your binary.
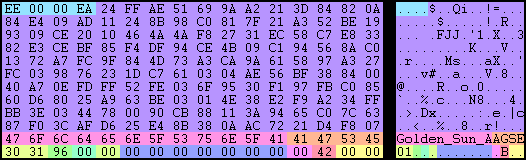
GBA ROM Header Structure
| Offset | Description |
|---|---|
| 0x00 - 0x03 | 32 bit ARM B Jump to start of ROM executable |
| 0x04 - 0x9F | Nintendo Logo data |
| 0xA0 - 0xAB | Game Title |
| 0xAC - 0xAF | Game Code |
| 0xB0 - 0xB1 | Maker Code |
| 0xB2 - 0xB2 | 0x96 Fixed |
| 0xB3 - 0xB3 | Main Unit Code |
| 0xB4 - 0xB4 | Device Type |
| 0xB5 - 0xBB | Reserved Area |
| 0xBC - 0xBC | Mask ROM Version |
| 0xBD - 0xBD | Compliment Check |
| 0xBE - 0xBF | Reserved Area |
Downloading DevKit Advance
This tutorial uses the free GBA development kit called Dev Kit Advance by Jason Wilkins. The current version is Release 5 (Beta 3) which is the version used in this tutorial. Download the following files from Sourceforge.
| Name | Size |
|---|---|
| agb-win-binutils-r5-beta-3.zip | 4,467 KB |
| agb-win-core-r5-beta-3.zip | 904 KB |
| agb-win-gcc-r5-beta-3.zip | 4,541 KB |
| agb-win-insight-r5-beta-3.zip | 5,646 KB |
| agb-win-libstdcpp-r5-beta-3.zip | 7,963 KB |
| agb-win-newlib-r5-beta-3.zip | 7,021 KB |
The homepage of Dev Kit Advance is http://devkitadv.sourceforge.net/ if you want to check for a newer version.
Installing DevKit Advance
- Extract the zip files to c:\ which should extract to the folder called devkitadv-r5-beta-3.
- Launch the DevKit-Advance-R5-Beta-3 icon it it's directory.
You should get the following prompt:

DevKit Advance Command Line Console
- I recommend downloading the DevKit Advance Here registry hack to enable you to right-click a file or folder anywhere in Explorer to open a DevKit Advance Console ready for compiling.
- You are now ready to compile!
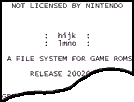
GBFS (Gameboy File System)
Why use a file system? There are many advantages to using a file system when developing for the GBA. It saves the pain of having to use tools such as bin2h or bin2obj to convert graphics/sound/text etc. into workable data in your programs. It is also much quicker to re-compile work after making changes to data files. GBFS is a file system developed by Damian Yerrick of PinEight and provides a way to access data files using the following C functions.
find_first_gbfs_file(const void *start);gbfs_get_obj(const GBFS_FILE *file, const char *name, u32 *len);gbfs_copy_obj(void *dst, const GBFS_FILE *file, const char *name);
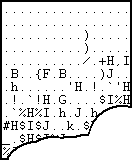
Each data file (Eg. Graphic, sound, text etc.) is appended to your compiled binary and accessed using the above functions. Below shows the GBFS Header for the file system in a pre-compiled GBFS file. The first part defines the GBFS_FILE and is a 32-byte header with the total length of the archive, offset to the directory and the number of files. The second two parts are 32-byte GBFS_ENTRY's and each one contains the filename of the file, length of the object in bytes and the offset to the file. As you can see below there are two files in this GBFS archive, test.chr and test.txt.

GBFS Header
- gbfs.h
typedef struct GBFS_FILE
{
    char magic[16];   /* "PinEightGBFS\r\n\032\n" */
    u32 total_len;    /* total length of archive */
    u16 dir_off;      /* offset in bytes to directory */
    u16 dir_nmemb;    /* number of files */
    char reserved[8]; /* for future use */
} GBFS_FILE;

typedef struct GBFS_ENTRY
{
    char name[24];   /* filename, nul-padded */
    u32 len;         /* length of object in bytes */
    u32 data_offset; /* in bytes from beginning of file */
} GBFS_ENTRY;
GBFS Unraveled
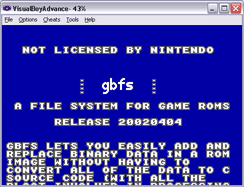
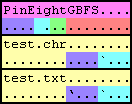
You can download GBFS here. You shouldn't have any problems getting the Demo to compile, just run the batch file mk.bat from the DevKit Advance command prompt. You should then be able to run test.mb.gba in an emulator such as Visualboy Advance.
You should see this demo run:
Lets have a look at how this demo uses the gbfs to store (1) The actual program code (2) Font character data, and (3) Text. Firstly we'll take a look at the batch file that builds the ROM.
- mk.bat
@echo off

echo === graphics ===
tools\gbfs test.gbfs test.chr test.txt

echo === code ===
gcc -Wall -O -mthumb -mthumb-interwork -s -o x.elf test.c libgbfs.c
if errorlevel 1 goto end
objcopy -O binary x.elf x.bin

tools\padbin 256 x.bin
copy /b x.bin+test.gbfs test.mb.gba

del x.elf
del x.bin
:end
The important lines here are bolded.
-
Line 04 runs gbfs which joins the files test.chr and test.txt together and adds the GBFS Header to the start of the data and outputs this as the file test.gbfs.
-
Line 07 runs the gcc compiler (from DevKit Advance bin directory) and compiles test.c to x.elf.
-
Line 09 uses objcopy to convert the x.elf file to a binary file, x.bin.
-
Line 11 pads the x.bin file to a 256 byte boundary, according to the author tepples, "The earliest versions of GBFS used a small stride for the linear search, but the current version uses a 256-byte stride for speed. I chose 256 bytes as a tradeoff between the speed requirements of a ROM program and the space requirements of a multi-boot program."
-
Finally, a very important part to remember is using the DOS copy command to join x.bin and test.gbfs and output those joined files to test.mb.gba. This basically joins the GBFS data files to the end of the program code.
-
test.mb.gba
x.bin
GBA Header
Compiled Binary
copy (append)
test.gbfs
GBFS Header
test.chr
test.txt
When we take a look at the actual program code in (test.c) we see how we access these data files from within our program.
const char *txt = NULL; // Pointer used for reading characters from test.chr
u32 txt_left = 0; // Used to store the size of the text file test.txt

const GBFS_FILE *dat = find_first_gbfs_file(find_first_gbfs_file);
The line above defines a constant called dat as a pointer to the first file in the file system by searching for the string "PinE". It's important that your binary is aligned to a 256-byte boundary (using something like padbin) before the GBFS data files are appended or the file system will not be able to find the "PinE" during the search. Also you must concatenate the GBFS immediately after the binary file and link libgbfs.c near the end for the above to work.
gbfs_get_obj(dat, "test.chr", NULL);Searches for the file entry called test.chr and returns a pointer to the test.chr data.
txt = gbfs_get_obj(dat, "test.txt", &txt_left);This searches for the file entry test.txt then returns a pointer to the test.txt data. txt_left is assigned the size of the object (in bytes). The txt variable is a pointer to the test.txt data and is used to move through the text file when outputting the text.
Image Compression on GBA
Images are notorious for taking up valuable ROM space so it's important that we use compression to minimize the space used by our images.
BIOS Decompression Functions
The GBA has several decompression functions available in it's BIOS. They are:
| Name | BIOS Function | Compression Routine | Size | Memory |
|---|---|---|---|---|
| BitUnPack | SWI 0x10 | |||
| Diff8bitUnFilterWram | SWI 0x16 | Differential | 8-bit | WRAM |
| Diff8bitUnFilterVram | SWI 0x17 | Differential | 8-bit | VRAM |
| Diff16bitUnFilter | SWI 0x18 | Differential | 16-bit | |
| HuffUnComp | SWI | Huffman | 8-bit/16-bit | |
| LZ77UnCompWram | SWI 0x11 | LZ77 | WRAM | |
| LZ77UnCompVram | SWI 0x12 | LZ77 | VRAM (safe) | |
| RLUnCompVram | SWI 0x15 | Run-Length | VRAM | |
| RLUnCompWram | SWI 0x14 | Run-Length | WRAM |
WRAM
Different compression routines give better results depending on the image. LZ77 is a good all round compression routine for images while the Difference Filter can give varying results but generally not a huge reduction in file size. 8-Bit Huffman works well with 16 colour images and Run-Length works well with images that have large flat colour areas.
Some GBA Compression Comparisons
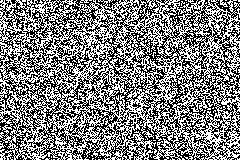
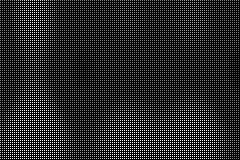
Here we compare some of the BIOS compression routines on two pictures. The first picture is notoriously hard to compress because most pixels are a different colour. The second image is reduced to 16 colours and demonstrates how the different compression routines work with open areas of colour and less colour. This is a very basic comparison and doesn't demonstrate the power of the compression routines for every type of data, it is for a basic look into how they work on two different types of images.

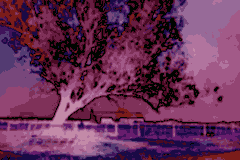
This image uses 256 colours and most pixels are a different colour. This picture is notoriously hard to compress so you may expect better results on your own pictures.
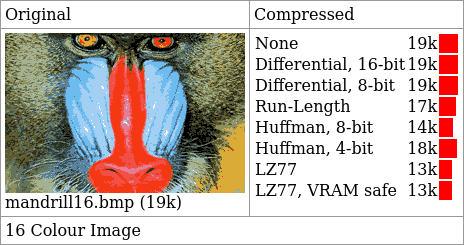
This image uses 16-colours and demonstrates how the various compression routines work in this example. As you can see LZ77 is probably the best overall compression routine for images and is the most common one used.
Hybrids
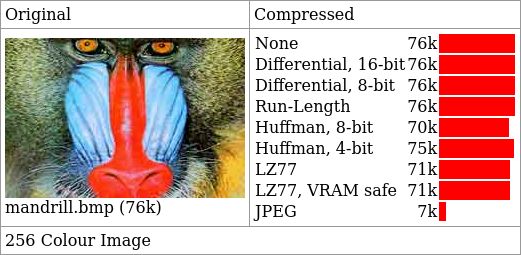
The Differential results in the previous comparisons may look misleading since it is often only useful for image or audio samples before running it through an LZ77 or Huffman routine. Again, thanks to tepples for clarifying that for us. He suggests we "take the mandrill16.bmp and run Differencing followed by 8-bit Huffman, reversing the process on display", so how about we give that a try?
Hmm running 8-bit Differential then 8-bit Huffman on the file renders a Hybrid file with a size of 14k which surprisingly is the same size of a standard Huffman 8-bit. My guess is that the bmp format is not suited to the Differential compression routine. I tried some other combination Hybrid's using Differential, but didn't seem to render any decent results. Can anyone shed some light on some file formats with work well with this routine?
GBA Crusher
John Sensebe's GBA Crusher is a handy tool for compressing data to include in your projects. It supports all of the GBA's BIOS compression formats and was used in all the compression comparisons and examples in this tutorial.
LZ77 Example
The LZ77 Bios decompression functions decompress at about 300-500 kilobytes per second. You should use the LZ77 VRAM safe mode option, because according to the author John Sensebe, "The compressed data can't reference the previous byte in the decompressed data, because it may not have been written yet by the BIOS due to the 16-bit bus to VRAM. Unfortunately, runs of the same value usually compress by writing an access to the previous byte, so they go wonky unless the compression routine works around the problem."
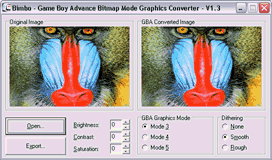
1. Download Aleksi Eeben's Bimbo program to convert your image to a format the GBA can read. Open the image you want to use. Select Mode 3 and any Dithering you like. Output the file to file.bin.
- Bimbo
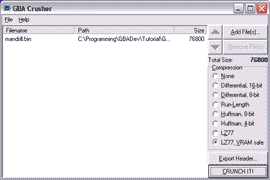
2. Open John Sensebe's GBA Crusher for compressing the file. Select Add File(s) and select file.bin. Select the LZ77-VRAM safe compression option. Select CRUNCH IT! and then save the file as file.lz.
- GBA Crusher
We create a file called lz77.h that will have our assembly functions to call the GBA's built in LZ77 decompression routines using the following code. This code can be slightly modified to use any of the GBA's BIOS decompression routines.
- lz77.h
// UnCompress LZ77 Data to WRAM
inline void LZ77UnCompWRAM(u32 source, u32 dest) {
asm("mov r0, %0\n"
"mov r1, %1\n"
"swi 0x11\n"
:
:"r" (source), "r" (dest)
:"r0", "r1" );
}

// UnCompress LZ77 Data to VRAM
inline void LZ77UnCompVRAM(u32 source, u32 dest) {
asm("mov r0, %0\n"
"mov r1, %1\n"
"swi 0x12\n"
:
:"r" (source), "r" (dest)
:"r0", "r1" );
}
Now we create the C code to call these functions and decompress the image to VRAM.
- tutor.c
#include <stdio.h>
#include <stdlib.h>
#include "gba.h"
#include "screenmode.h"
#include "gbfs.h"
#include "lz77.h"

u16* videoBuffer = (u16*)0x6000000;
u16* paletteMem = (u16*)0x5000000;

int main(void)
{
    const GBFS_FILE *dat = find_first_gbfs_file(find_first_gbfs_file);

    SetMode(MODE_3 | BG2_ENABLE); /* Enable mode 3 and turn on background 2. */
    REG_BG2CNT = 0; /* Clear all BG2 parameters. */

    LZ77UnCompVRAM((u32) gbfs_get_obj(dat, "mandrill.lz", NULL), (u32)videoBuffer);

    while(1) {};
}
Run the mk.bat in the DevKit Advance prompt and we should get the following output:
- LZ77 Output
The source and binaries for this project are available here.
Differential, Huffman, Run-Length & LZ77 Examples
I have created a demo project using all the BIOS Decompression functions placed in decompress.h. I used Aleksi Eeben's Bimbo to convert mandrill.bmp to a binary mandrill.bin file that the GBA can display. Then using GBA Crusher I compressed them using each compression routine.
| Filename | Compression Routine |
|---|---|
| mandrill.d16 | Differential, 16-bit |
| mandrill.d8 | Differential, 8-bit |
| mandrill.rl | Run-Length |
| mandrill.h8 | Huffman, 8-bit |
| mandrill.h4 | Huffman, 4-bit |
| mandrill.lz | LZ77 |
| mandrill.lzs | LZ77, VRAM safe |
This demo will go through the following routines (in the order they are presented in GBA Crusher), press the A Button after each display and the screen will blank for a seconds and draw the next decompressed file.
- tutor.c
Diff16bitUnFilter((u32) gbfs_get_obj(dat, "mandrill.d16", NULL), (u32)videoBuffer);
Diff8bitUnFilterVram((u32) gbfs_get_obj(dat, "mandrill.d8", NULL), (u32)videoBuffer);
RLUnCompVram((u32) gbfs_get_obj(dat, "mandrill.rl", NULL), (u32)videoBuffer);
HuffUnComp((u32) gbfs_get_obj(dat, "mandrill.h8", NULL), (u32)videoBuffer);
HuffUnComp((u32) gbfs_get_obj(dat, "mandrill.h4", NULL), (u32)videoBuffer);
LZ77UnCompVRAM((u32) gbfs_get_obj(dat, "mandrill.lz", NULL), (u32)videoBuffer);
LZ77UnCompVRAM((u32) gbfs_get_obj(dat, "mandrill.lzs", NULL), (u32)videoBuffer);
And we simply add the following line to mk.bat to join our compressed images:
- mk.bat
echo === graphics ===
tools\gbfs tutor.gbfs mandrill.d16 mandrill.d8 mandrill.rl mandrill.h8 mandrill.h4 mandrill.lz mandrill.lzs
The source and binaries for this project are available here.
aPLib Library
Joergen Ibsen's aPLib is one of the best pure LZ-based compression library's available and works exceptionally well for GBA sprite & tile data. It's not the fastest decompression so if speed is a concern then this routine may not be for you. Using aPLib is free for non-commercial use; to use aPLib in a commercial project visit Ibsen Software for registration details.
I'm using Markus' gfx2gba to convert my image to GBA 8 colour tile format which conveniently has a built in aPLib compressor. Unfortunately gfx2gba creates a separate file for the palette data so we will need to join the raw binary data with the palette data using copy.
- convert_gfx.bat
gfx2gba013 -fraw -t8 -c16 -q -zt -ap barn.bmp
copy /b master.pal+barn.raw barn.ap
The -ap switch in gfx2gba tells it to use the aPLib compressor instead of lz77. My test image gave a 49% compression ratio using aPLib and a 38% ration using LZ77.
- Mode 0, 16 Colour Tiles
aPLib
farm.ap (49% ratio)
LZ77
farm.lz (38% ratio)
The de-compressor can't be used to write directly to VRAM because it only writes one byte at a time, although it can be modified to.
So the first thing we do is set up a buffer in EWRAM to place our decompressed data before we copy it to VRAM.
- tutor.c
#define DATA_IN_EWRAM **attribute** ((section (".ewram")))
u16 DATA_IN_EWRAM Buf[9600];
Then we set our video to Mode 0 and turn on BG 0 to output our tiles.
- tutor.c
#define TILE_DATA 2
#define TILE_MAP 8

SetMode(BG0_ENABLE | MODE_0); // set mode 0, turn on BG0
REG_BG0CNT = TXTBG_SIZ_256x256 | 0 << TILE_MAP | BG_COLOR_16 | 1 << TILE_DATA;
Now we get our pointer to our file with our appended palette and tile data (farm.ap) and place the 32 byte palette data it into our first palette entry.
- tutor.c
#define TileDataAddr(n) (((n)*0x4000)+0x6000000)
#define TileMapAddr(n) (((n)*0x800)+0x6000000)
#define ColorPaletteAddr(n) (((n)*0x20)+0x5000000)

// Get a pointer to our palette and compressed image data
pGfx = (u16*) gbfs_get_obj(dat, "farm.ap", NULL);

// Load image palette
pMap = (u16 *) ColorPaletteAddr(0);
for (i = 0; i < 16; i++) pMap[i] = pGfx[i];
Finally, we decompress our aPLib compressed image data into our buffer in EWRAM and then write it back into VRAM. Then we call draw_map() to write our tile map data and display the image on BG 0.
- tutor.c
#define PALETTE_SIZE 16

// skip the palette data and decompress the image data to our buffer
aP_depack((u8*) (pGfx+PALETTE_SIZE), (u8*) Buf);

pGfx = (u16 *) TileDataAddr(1); // Picture on BG 0
for (i = 0; i < 9600; i++) pGfx[i] = Buf[i];

draw_map();
The source and binaries for this project are available here.
PuCrunch
PuCrunch is a hybrid of the LZ77 and Run-Length Encoding compression routines originally written by Pasi Ojala for the C64. PuCrunch is known to run slower than LZ77 but will often give better results than the internal BIOS routines in overall compression. In my tests PuCrunch was slightly outperformed by aPLib in terms of compression. You can visit the official website for PuCrunch here.
Jeff Frohwein has kindly re-written the unpacking library for the GBA in ARM/Thumb assembly.
PuCrunch can write directly to VRAM by modifying a line in the pucrunch.s source file (view the file for more details).
PuCrunch
- Mode 0, 16 Colour Tiles
PuCrunch
farm.pu (47% ratio)
aPLib
farm.ap (49% ratio)
Again using Markus' gfx2gba we convert our image to GBA 8 colour tile format and this time we need to use the pucrunch compressor to pack our image data. We use the -d -c0 switches with pucrunch so our compressed data wont include C64 specific code.
- convert_gfx.bat
gfx2gba013 -fraw -t8 -c16 -q farm.bmp
pucrunch -d -c0 farm.raw farm.tmp
copy /b master.pal+farm.tmp farm.pu
I'm using the same code as with the previous aPLib example except we make a call to Jeff's uncompressor function instead.
- tutor.c
UnpackPUC((u8*) (pGfx+PALETTE_SIZE), (u8*) Buf);The source and binaries for this project are available here.
Displaying a JPEG Image on the GBA
Our second part of the image compression tutorial will be using Burton Radons JPEG Decompression Library to display a JPEG image and Damian Yerrick's GBFS to append the image to the end of our binary code. JPEG is an excellent alternative if you intend on using several 256 colour images in your project. Using Adobe Photoshop and it's Save for the Web facility I managed to get the 256 colour mandrill.bmp down to a 7k JPEG image, so as you can see this is a very good alternative to using the LZ77 compression routine.
Currently the JPEG Decompression Library doesn't support all JPEG formats, such as progressive and lossless, but these formats shouldn't be necessary for our projects anyway.
Ok, now onto the code...
Using the GBFS Demo source as our guide, with a gba.h file by eloist containing some important GBA hardware definitions we simply adapt the mk.bat to add our mandrill.jpg file to our binary and add some code to display the image.
- tutor.c
int __gba_multiboot;

#include <stdio.h>
#include <stdlib.h>
#include "gba.h"
#include "screenmode.h"
#include "gbfs.h"
#include "gba-jpeg-decode.c"

u16* videoBuffer = (u16*)0x6000000;
u16* paletteMem = (u16*)0x5000000;

int main(void)
{
     const GBFS_FILE *dat = find_first_gbfs_file(find_first_gbfs_file);

     SetMode(MODE_3 | BG2_ENABLE); /* Enable mode 3 and turn on background 2. */
     REG_BG2CNT = 0; /* Clear all BG2 parameters. */

     JPEG_DecompressImage(gbfs_get_obj(dat, "mandrill.jpg", NULL), videoBuffer, 240, 160);

     while(1) {};
}
Run the mk.bat in the DevKit Advance prompt and we should get the following output:
- JPEG Output
The source and binaries for this project are available here.
Displaying a PCX Image on the GBA
Coming soon...
Audio Compression
For this part of the tutorial we will be taking a look at tepples's ADPCM-based 8ad codec, which is a lossy compression technique based on Differencing..
Then we will discover the benefits of running Differencing before a Huffman on an 8-bit sample. This is a lossless method of compression. You can experiment with what works best for your projects and decide on what you want to use. I simply don't have the time to provide comparisons and examples for every combination of compression.
ADPCM
- chordbasic.wav
Bit Rate: 290kbps
Sample Size: 16 bit
Channel: Mono
Sample Rate: 18khz (18157 Hz)
Audio Format: WAV PCM
Filesize: 140 KB
Here we have our 16-bit WAV sample to include in our project. Why 16-bits you ask when the GBA hardware is only 8-bit? It's because the clarity of a 16-bit audio file creates a better quality sample after the conversion process.
We check out the mk.bat file in tepples ADPCM Demo and we find the following line:
- mk.bat
echo === assets ===
tools\wav28ad sample\chordbasic.wav sample\chordbasic.8ad
tools\gbfs adcm.gbfs sample\chordbasic.8ad
We see a call to tepples wav28ad program that converts the wav file to the 8ad format. Again I won't go into exhaustive detail here since you can take a look at the project code yourself. Our interest here is how much file reduction we get on the chordbasic.wav using ADPCM. The original chordbasic.wav filesize was 140k, and the compressed file chordbasic.8ad is 35k, that's a 1:4 compression ratio, so as you can see this is quite a powerful compression algorithm for GBA sound.
I have slightly modified tepples original Demo source and compiled the tools for you. My version removes the keypad handling and screen output. It simply plays the sample in a loop. Changing a line in the code will play the sample once and stop. I thought it would be easier to integrate this into your own project without the overheads.
The source and binaries for this project are available here.
Differencing & Huffman
Coming soon...
Working with Palettes
You will undoubtedly enter some problems with tiles and sprite data at some stage noticing that images are displaying in a strange way on the GBA screen. For example, take a look at the following image rendered in Mode 0 using 16 Colour Tiles. (Thanks to Luse for the image provided in the example).
- Mode 0, 16 Colour Tiles
Image

barn.bmp
On GBA Display

barn.bin
You will notice a strange effect happening in the image when it's displaying on the GBA Screen. What is this bright magenta colour? Well, it can be any colour, but the reason it does this is because the GBA always treats Palette Entry 0 as a transparency. The obvious solution to this problem would be to move the effected colour in the Palette to Palette Entry 0, so it will become the background colour black which is what we want. The unfortunate thing is, you won't find many graphic software that provides such a feature including Photoshop (tut tut Adobe).
Fortunately there is some software out there, namely Gimp and GraphicsGale as well as the old 16-bit BitEdit/PalEdit that can all do the Palette manipulation required to fix this problem. In this example I will be using GraphicsGale. There is a new program I have written called PalEdit.
- How to move a Palette Entry in Graphics Gale
Palette Before
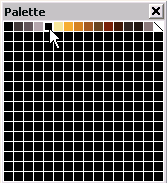
Background is <Palette Entry 4
Palette After
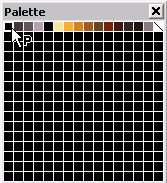
Shift-Drag the "Pot" to Palette Entry 0
When we load up barn.bmp we notice that the Background Colour is set to Palette Entry 4. We want to move this to Palette Entry 0, so that our background becomes the transparent colour. Hold down the Shift key and while dragging the Palette Pot to Entry 0. This should solve our problem!
Screen Effects
This part of the tutorial covers screen effects such as Fades and Alpha Blends (using the register BLDMOD & BLDCOLV/BLDCOLY), Wipes (using Windows & Interrupts), Scrolling (using REG_BGxHOFS & REG_BGxVOFS), Mosaic (using REG_MOSAIC), Sinewave Screen Effects (using HBLANK/VBLANK Interrupts and the REG_BGxHOFS & REG_BGxVOFS scroll registers), Plasma type effects (Colour Cycling combined with Sinewave & Scroll Registers with the tool SinusLab by Hitmen).
Currently there are some examples of using Windows (for screen wipes, cross wipes, scanline effects, diamond wipes, and triangle cross wipes) and the Mosaic effect from Alex Pagliaro's (Dark Cloud's) All_Screen_Demos.zip. There are also some interesting effects using palettes and black and white images Swirl.zip. Another interesting effect is Cearn's Spotlight effect, which is discussed in more detail here with source code available from here.
Fades
- fades
u16 _reg_BLDMOD = (u16 _)0x4000050;
u16 _reg_BLDCOLV = (u16 _)0x4000052;
u16 _reg_BLDCOLY = (u16 _)0x4000054;

void FadeIn(u16 factor)
{
    reg_BLDMOD[0] = (3<<6) | 63;
    reg_BLDCOLY[0] = factor;
}

void FadeOut(u16 factor)
{
    reg_BLDMOD[0] = (3<<6) | 63;
    reg_BLDCOLY[0] = factor;
}

void fade_in()
{
    while(fade>0) { fade--; FadeIn((fade>>2)); WaitVBlank(); }
}

void fade_out()
{
    while (fade != (16<<1)) { fade++; FadeIn((fade>>2)); WaitVBlank(); }
}
Wipes
- Horizontal/Vertical Wipes

- Circle/Spotlight

- Diamond

- Scanline
- Cross

- Tricross

- Swirl

- Wave / Sinewave

- Pseudo Random Speckle
- Plasma
Actual code coming soon...
MOD Players
There are several MOD Players out there to save you the time of writing your own sound mixing engine, so I will cover some of them here. Here is a comparison of the various MOD Players and the features they provide.
| Audio System | Channels | Sample Rate | Channel | Format | Data Format | GBFS | FX System | CPU Usage | Audio Quality | Cost |
| AFM (Another F**king MOD Player) | 4 | 15.290 Khz | Stereo | MOD | RAW | YES | No | ? | V GOOD | FREE From Hitmen |
| Krawall Soundsystem | 4/8 | 16/32 Khz | Mono/ Stereo | S3M, XM | CONVERSION REQD. | NO | 8-bit mono S3M Format | ~15% @ 8ch 16Khz | GOOD | Free for non-commercial use with FREE SDK (No XM support) 17 € for non-commercial use for full version. 350 € for commercial use. Contact Krawall for more information. |
| AAS (Apex Audio System) | 4/8 | 8-32 Khz | Mono/ Stereo | MOD | CONVERSION REQD. | NO | RAW (8-bit mono PCM) WAV (8-bit mono PCM) |
~0.8% @ 16Khz (Mixer) ~1% @ 32Khz (Mixer) ~2.7% @ 4ch 16Khz (Mod) ~3.6% @ 4ch 32Khz (Mod) |
V GOOD | Free for non-commercial use (Requires Logo at start) For the full version contact Apex for License details. |
| F.R.A.S (Free Realtime Audio System for Gameboy Advance) | 1/2/4/8/16/32 | LOW: ~15.76Khz MEDIUM: ~18.157Khz HIGH: ~21.024Khz |
Stereo | MOD | CONVERSION REQD. | NO | No | LOW: ~12.6% MEDIUM: ~14.5% HIGH: ~16.7% |
GOOD | Free for both non-/commercial use Website Fras |
| MASO Player | 4/8 | ? | Stereo | XM | CONVERSION REQD. |
NO | 8-bit mono PCM WAV | 20% @ 8ch 20Khz | GOOD | Free for non-commercial use (Requires Logo at start) Commercial use is cancerware (visit MASO for license details) |
| Music Wave Engine | 4 | 5-22Khz | Stereo | MOD | RAW | YES | 8-bit mono PCM WAV | 10-30% | GOOD | Free for freeware projects Contact Code Waves for commercial use. |
| NMod v1c | 4 | 16 Khz | Stereo | MOD | RAW | YES | No | ~6% @ 125bpm | AVERAGE | Need author's permission (see readme.txt) Full version is available as part of Catapult |
I recommend downloading the free MODPlug Tracker to see how this format is used to store music. MODPlug can read/write Protracker (MOD), Scream Tracker (S3M), Fast Tracker (XM) and Impulse Tracker (IT) files.
Skale Tracker is another free tracker available for PC and Unix, and has a nicer interface for actually making music IMO. Skale Tracker can load/save in SKM (Skale), WAV, OGG, XM (Fast Tracker II), MOD and MID (MIDI) format.
Try them both out and decide for yourself what you want to use. For general conversion work MODPlug Tracker should be fine.
If your interested in writing tunes for the GBA professionally, you might want to check out what the pro's use and that's MED Sound Studio by RBF Software. I'm a beta-tester and V2 is currently in the works. Anyone who remembers OctaMED on the Amiga will know this Tracker well. You can check out an interview I had with the oldskool tracker musician Alistair Brimble about MED and music. He currently makes music professionally for the GBA and several other consoles. You can read the interview here.
- MODPlug Tracker
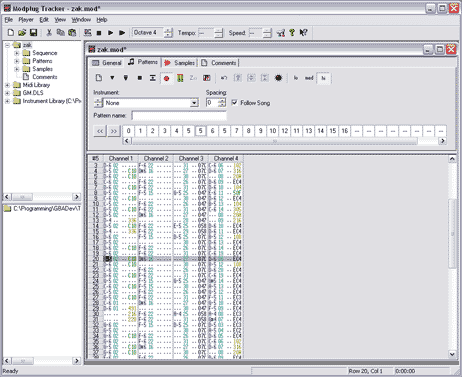
Notes are represented by columns of data that are joined by blocks or patterns. For the GBA, we can get a fairly decent tune working with 4 channels (tracks) of audio using 8-bit mono samples.
- Tracker Data
![]()
If you want to check out the MOD used in this tutorial and see how MODPlug plays the tune, you can download zak by doh.
AFM (Another F**king Module Player)
Another F**king Module Player by Silpheed and Groepaz of Hitmen is one of the best freeware players out there.
With AFM it's just a matter of giving it a pointer to the MOD data and away it goes which means it's fairly easy to get working with a file system like GBFS.
Here is the code in tutor.c:
- tutor.c
int __gba_multiboot;

// need to be first in internal RAM!
unsigned char __afm_work[0x400+0x100] __attribute__ ((section (".iwram")));

#include <stdio.h>
#include <stdlib.h>
#include "gba.h"
#include "screenmode.h"
#include "gbfs.h"
#include "afm.h"

//IntrTable for crt0
void (*IntrTable[])() = {
    0, // v-blank
    0, // h-blank
    0, // vcount
    0, // timer0
    0, // timer1
    0, // timer2
    0, // timer3
    0, // serial
    0, // dma0
    0, // dma1
    0, // dma2
    0, // dma3
    0, // key
    0 // cart
};

u16* videoBuffer = (u16*)0x6000000;
u16* paletteMem = (u16*)0x5000000;

// wait for vblank
void WaitVBlank(void)
{
    while (REG_VCOUNT != 160) { };
    return;
}

int main(void)
{
    unsigned short key,vol=0xff,ch=2;
    const GBFS_FILE *dat = find_first_gbfs_file(find_first_gbfs_file);

    SetMode(MODE_0 | BG2_ENABLE); // Enable mode 3 and turn on background 2.
    REG_BG2CNT = 0; // Clear all BG2 parameters.

    REG_DISPCNT=0;

    // install player
    afm_install();

    // initialize module
    afm_init(gbfs_get_obj(dat, "zak.mod", NULL));

    while(1)
    {
        // call this every frame
        // this routine may be delayed
        afm_update();

        // wait for vblank
        WaitVBlank();

        // must call this right at the start of vblank with minimum delay
        afm_sync();
    }

    // deinstall player, stop playing any sound
    afm_deinit();
}
Then we add the following code to our mk.bat file:
- mk.bat
@echo off

echo === assets ===
tools\gbfs modfile.gbfs mods/zak.mod

echo === build crt0.o ===
as -mthumb-interwork -marm7tdmi -o crt0.o crt0.s
if errorlevel 1 goto end

echo === gcc ===
gcc -L. -mthumb -mthumb-interwork -Tlnkscript -nostartfiles -o 1.elf crt0.o tutor.c libgbfs.c -lafm -lgcc
if errorlevel 1 goto end

echo === objcopy ===
objcopy -O binary 1.elf 1.bin
if errorlevel 1 goto end

tools\gbafix 1.bin -tMOD_DEMO
tools\padbin 256 1.bin
copy /b 1.bin+modfile.gbfs tutor.mb.gba
start tutor.mb.gba

:end
As you may have noticed I haven't used makefile's but a simple batch file because I think it's easier to understand for the beginner and as you get more advanced you can convert the batch file over to a makefile.
All of the players featured on this page use Jeff Frohwein's crt0.s (Startup code) and Linker Script and it's essential to add these to the linking part using the -Tlnkscript and -nostartfiles options in gcc. You can obtain copies of Jeff's crt0.s and other helpful GBA stuff from his excellent website Gameboy Advance Dev'rs.
That's it! I don't really need to explain how the GBFS attaches the MOD to the ROM, or how you get the pointer to the file using gbfs_get_obj because we learnt that earlier in the tute about GBFS.
The source and binaries for this project are available here.
Krawall Soundsystem
The Krawall Soundsystem by Sebastian Kienzl is quite a good S3M/XM Player and it has it's own benefits and downfalls. S3M by the way is the old Scream Tracker module format. MODPlug can convert MOD's over to S3M's, just load up the song and in the main window, select the general tab, under song type click change... and change it to ScreamTracker S3M then save it. The good part about this audio system is that it has the ability to attach empty S3M's that contain sample's (but no music data) for playing sound effects while the module is playing. A disadvantage is that it needs to convert the S3M to a format it can understand first. This is not necessary a problem since you can just add a line in your makefile to convert them over. The problem is you can't just attach the S3M to your binary code using GBFS.
Krawall has a FREE SDK based on an older version without XM support. This is the version used in my code example. You can probably expect better results in the license version.
Perhaps I will modify it some day to work with GBFS.
The source and binaries for this project are available here.
AAS (Apex Audio System)
The Apex Audio System (AAS) by Apex Designs is another free for non-commercial use MOD Player. It works in a similar vein to Krawall in that it converts the MOD file to a format it understands. It also has the ability to play WAV or RAW samples while the MOD is playing. If you use the free version you have to display the Apex logo at the start of your ROM.
I have not got this working with GBFS yet.
The source and binaries for this project are available here.
Fras Player
Fras Player by DannyBoy is free for both non-/commercial projects and looks like a pretty good player. Although it doesn't seem to play my example zak.mod very well, the country.mod used in his example does sound ok. My advice would be to download the player and have a listen to how it works with your MOD before you decided to use this.
Because of the conversion required of the MOD to a format it can understand, I have not converted it to work with GBFS yet.
The source and binaries for this project are available here.
MASO System
The MASO System was developed by fl0w. I have to admit I had a few problems with this player. First of all getting my zak.mod converted to an xm format it would accept was not easy. I tried MODPlug Tracker to save the mod to the Fast Tracker xm format, but then the MASO conversion program protested saying it doesn't "support Amiga frequency tables". Not one to be deterred by such things I looked up the xm header format and found that by changing a byte at offset 74 (0x4A) from 00 to 01 the converter would think it used a Linear frequency table instead.
Ok, so it compiled ok but a little way into the tune it would crash in Visualboy Advance saying "Unsupported BIOS function FE called". So I tried using Skale Tracker to convert it from a MOD to XM but the same problem occurred. I tried running my binary in VBA with a GBA BIOS file but Visualboy would just reset at the same point instead.
I tried compiling with the xm object file supplied with Fl0w's example (for legal reasons he doesn't supply the actual xm file in his MASO distribution example) and the song played fine. Obviously there was something it didn't like about my zak.mod file. At first I thought it was one of the commands such as Arpeggio or Vibrato. But I soon figured out the problem was in fact that the MASO System doesn't like notes that don't specify a key (eg. C#-5). In a normal tracker circumstance you can generally just specify the sample number and it will play the same key & octave as the previous note, just with this new sample instead. I could use MODPlug's search and replace to fix this, but I didn't bother.
Perhaps it will work better with your xm?
Please note that all the code on my page is modified by me to work with DevKit Advance. To get the original code please visit the associated website.
The source and binaries for this project are available here.
Music Wave Engine
Code Waves' Music Wave Engine is the only MOD Player supporting sample playback that I have got to work with GBFS. This is mainly because it uses the raw MOD data and you can just give it a pointer to it in ROM. For some reason he has created custom start up code instead of implementing Jeff's crt0.s. This means this player could be a little awkward to merge with your existing code.
The source and binaries for this project are available here.
NMod v1.c
NEiM0D's NMod Player is a fairly decent MOD Player which I managed to get working with the GBFS quite easily. Again I won't bore you with the code necessary to get this working since you can download the project and see for yourself.
The source and binaries for this project are available here.
Thanks
This tutorial was not possible without the help of the following people:
A special thanks to Damian Yerrick (Tepples) for GBFS, the gbadev FAQ, and much of the code used in this tutorial. Also he has helped refine the information provided here and clarify some things.
SimonB, Jason Wilkins, Forgotten, John Sensebe, Dovoto, Dark Fader, eloist, Martin Koth, Aleksi Eeben, Dark Cloud, Hitmen, Jeff Frohwein, Sebastian Kienzl, James Daniels, DannyBoy, NEiM0D, Quirky, gb_feedback
Dovoto for his awesome PERN Project tutorials which covers everything else you want to know about GBA coding
GBAGuy for his GBA ASM Tutorials that are really helpful for learning how the ARM processor works and for writing faster code
Let me know if I've missed your name.
Greetings
Go out to Team Magnolia, GBATemp, gbadev.org, forum.gbadev.org, #gbadev, gbaemu, Pocket Heaven... and everyone else I've met and spoken to over the years in the GBA community.
References
Korth, M. (2001-2002). Gameboy Advance Technical Info [On-line]. Available WWW: http://www.work.de/nocash/gbatek.htm. [2004, 1 February].